
How to Integrate Trend Micro Apex One / Apex Central Email Notifications with Office 365 via SMTP Relay
TrendMicro Apex One/Apex Central Email Notification Integration with Office365

Integrating Trend Micro Apex One or Apex Central with Microsoft Office 365 for email notifications ensures critical security alerts are delivered in real-time. This step-by-step guide walks you through configuring email notifications using an SMTP Relay server, a necessary bridge for Office 365 email delivery.
This method is particularly useful for environments where direct SMTP connections from Apex Central to Office 365 are blocked or limited.
Prerequisites
-
A Windows Server machine (2012/2016/2019/2022) for SMTP Relay
-
A valid Office 365 (Microsoft 365) email account
-
Admin access to Trend Micro Apex One or Apex Central
-
Access to Server Manager and IIS 6.0 Manager (for SMTP configuration)
Step-by-Step Guide to Configure SMTP Relay for Office 365
Step 1: Install SMTP Server Feature
-
Open Server Manager.
-
Click on Add Roles and Features.
-
Under Features, scroll down and select "SMTP Server".
-
Follow the wizard to complete the installation.


✅ Note: IIS 6.0 Management Tools will be installed automatically as a dependency.
Step 2: Configure SMTP Relay in IIS 6.0 Manager
-
Open IIS 6.0 Manager (
inetmgr6). -
Right-click on [SMTP Virtual Server] under your server name and select "Properties".

-
In the General tab, verify:
-
IP Address is set to your SMTP Relay server’s IP
-
TCP Port: 25


Under Outbound Security->Provide the email id of Office365, and select TLS encryption.

-


Step 3: Set Up Outbound Security
-
Go to "Access" > Outbound Security.
-
Select "Basic Authentication".
-
Enter your Office 365 email address and password.
-
Check "TLS Encryption".
Step 4: Set Up Outbound Connections
-
Still under "Access", click "Outbound Connections".
-
Set the TCP Port to 587 (required for Office 365 SMTP).


Step 5: Configure Advanced Delivery Settings
-
Under the "Delivery" tab, click Advanced.
-
In the Smart Host field, enter:


Configure Apex Central Email Notification Settings
Once the SMTP Relay is properly set up, you can configure email notifications in Trend Micro Apex One / Apex Central.
Step 6: Access Notification Settings
-
Log in to Apex Central Console.
-
Go to:


Step 7: Enter SMTP Details
-
SMTP Server IP Address: IP of your configured SMTP Relay Server
-
Port: 25
-
Sender Email Address: Office 365 account used in SMTP
-
ESMTP: Do NOT enable
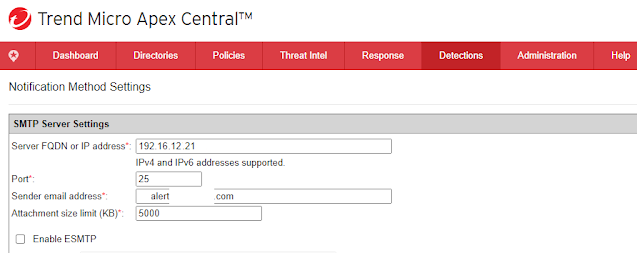

Click Save to apply the changes.
Test Email Notification Settings
To ensure everything is configured correctly:
-
Navigate to:

-
Select any event and click Test.


You should see the confirmation:
"Email notification was sent successfully."

Check your Office 365 mailbox to verify the test alert has arrived.
Sample Email Notification
When configured properly, Apex Central will send real-time alerts like:
Subject: Trend Micro Security Alert: Detection Event
Body: A detection event has occurred on [HOSTNAME]. Details include...


Summary
Integrating Trend Micro Apex One / Apex Central with Office 365 SMTP Relay allows seamless email notifications, keeping your security team informed of real-time threats and events.
Key Configuration Highlights:
| Setting | Value |
|---|---|
| SMTP Smart Host | smtp.office365.com |
| SMTP Relay Port | 587 |
| Apex Central SMTP Port | 25 |
| ESMTP | Disabled |
| TLS Encryption | Enabled |
| Authentication | Basic (Office 365 Email + Password) |
Troubleshooting Tips
-
Can't send emails? Ensure port 587 is open outbound on the SMTP Relay server.
-
Authentication errors? Double-check the Office 365 email credentials and enable SMTP Auth in Microsoft 365 admin settings.
-
TLS issues? Make sure TLS 1.2 is enabled on the SMTP Relay server.
Post a Comment